Second Generation Nissan Xterra Forums banner

Heater Core TEE Alternative and Fix

37K views 38 replies 24 participants last post by  smj999smj  
#1 ·
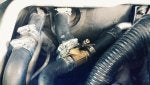
I'm sure some of you have experienced this same issue as I have. The heater core tee is permanently attached to a rubber hose, which then is permanently attached to a metal tube. If the rubber hose or the plastic tee were to fail you would then have to replace the entire assembly, which runs about 60 to 80 bucks. Personally, I think that's garbage!

Anyhow, I accidentally broke tee one day while I was replacing the PCV on the truck. I brushed up on it and the thing disintegrated!

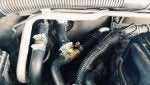
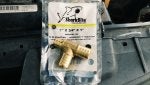
Solution: bought a 1 in. x 3/4 in. x 1 in. Brass PEX Barb x Barb x Barb Tee from the home depot site for 6 bucks. They don't offer this size at the local store so I had to order online. I had it shipped to the store for free, it only took about 3 days to arrive. I cut plastic and rubber coupler from the metal tube with a pipe/tube cutter that I bought from autozone. Gave me a nice seamless cut.

Key things: use petroleum jelly to lubricate the brass tee before sliding the rubber hose. Attach the rubber hose the brass tee BEFORE installing to heater core tube! You'll know what I mean once you get started.
 

Attachments

#16 ·
Good point, it would be a high point in the coolant system so any air in the system will tend to end up there and then go to the overflow reservoir where the air would register as a lower coolant level (like it's suppose to). I'm gonna make it a point to set up the brass triple TEE with an added elbow (when I get them) to mimic the plastic configuration.
 
#17 · (Edited)
My brass triple Tee was delivered today so I locally picked up an elbow, hose and clamps and installed it. Less than $25 in parts total. Got the top hose vertical and used a 90 deg elbow on the bottom so it looks like the factory plastic configuration (sorry, not setup to post picts). The nozzle on the top of the factory plastic triple Tee is actually 0.5 inch so I was worried about getting the top hose on to 0.75 tip but after seeing it done here and in the MacGyver'd fix forum, I was able to force it on but couldn't use the factory spring clip.

I also see a reason for the extension on the inlet side. It keeps the inlet hose separated from the triple Tee as it arcs underneath. Without the extension, the inlet hose gets kinda close to my brass triple Tee setup. I may work in an inlet extension like shown in the first post here but 1 inch brass fittings are hard to come by locally. Dorman does sell a metal extension. Lets see what I can find locally.
 
#18 ·
I ultimately decided to go with OEM parts. Replaced both inlet and outlet side this weekend. Pretty easy job. A few hose clamps and 2 nuts securing the outlet hose to the firewall. You'll need about .5 to 1L coolant for the job. Or if you have a small bottle you can catch most of the coolant when you release the lower outlet hose connection on the driver side.

I'm glad I did this now. The original plastic crumbled into pieces as soon as the hoses came off.


Do you have any pictures of your setup with the additional elbow?
 
#20 · (Edited)
Bringing this back up. I removed the passenger side plastic fitting yesterday and simply attached the hose directly to the heater core. No parts needed, just a little coolant lost in the swap.

This is wrong. The tee sizes aren't for hose.
Now I'm looking at doing the driver side tee and I think this is actually the "Sharkbite" fitting needed. 3/4 x 3/4 x 1/2" Tee

https://www.homedepot.com/p/SharkBi...ng-UC444LFA/202270600?MERCH=REC-_-PIPHorizontal2_rr-_-202270599-_-202270600-_-N


I'm going to look into some way to slightly flare the end of the pipe behind the engine so the hose is less likely to slip off with the clamp installed. Not sure how I'll do that just yet but once it's done, this should be a permanent solution with no proprietary plastic parts involved. Also going to find a 3/4" 90* heater hose from a parts house to use off the bottom of the tee so it doesn't kink. I'll post part numbers for anything I need as I find them.
 
#21 ·
I measured the pipe behind the flare and it's 0.759". I ordered a double-flaring tool with a 3/4" die that I should be able to make the bubble on the end of the tube with that.

I'm hoping to get that done this weekend if my flaring tool arrives Friday like it should.
 
#27 ·
I have had issues with this plastic tee on both of my Xterras. I replaced inlet and out pieces with Dorman after the tee sprang a leak and nearly left me stranded.

My new opinion is that these both must be replaced absolutely. Especially if your truck is getting older, say 10-12 years. Although the out tee is especially known to fail, I noticed the inlet was also super brittle and broke while taking it out even though I was trying hard to leave it intact.
 
#28 ·
My daughters ’07 W/ 160k miles sprung a leak in the extension fitting on her way home from school.
put the Dorman part on it from the local parts house.
Installation was pretty easy, just figuring out which pliers fit the spaces best.
I have the brass tee in my Amazon Cart for the next order I place to have it ready, the other side of the heather sys cant be far from failure as well.
Tips for the next installer:
1) Move the clamp closest to the firewall as far forward as you can, cut the hose with a knife in two or three places from the firewall forward. Bend hose downward and it will come off easily with the least stress on the heater core fitting.
2) Use a little bit of coolant on your finger and wipe it into the end of the hose for lubrication to make the assembly easy.
I checked my 2019 Frontier Pro 4X - Same parts... I’ll have a Dorman part and a brass tee on the shelf ready for anytime the cooling system gets opened up for service.
 
#37 ·
“the 05+ xterras use a self bleeding system, the actual pressure cap for the cooling system is the cap on the plastic reserve tank, the cap on the radiator is just a place to check and add to if needed but isnt the pressure cap for the system. the way this system is built the tank is part of the flow of the coolant system and serves as the high point and has a vent to allow air to vent from the system. this goes into extreme detail on cooling system of these trucks: 2006 Nissan Xterra – Repair Manual - Enging Cooling System (Section CO) – 30 Pages – PDF. however most DIY-ers wont have the tools referenced in this manual and therefore drain, fill and go drive it a short distance (enough for it to warm up) then check coolant level again. you also want to check the level with the engine cool and running it should be between max and min in tank and radiator should be full. usually takes 2-4 drives to get it full and get all the big air pockets out.” From a friend on another forum kms 1990
 
#39 ·
I tried that on my 2013 X and still blows cold when idling, but hot when driving. Coolant time is right where it should be. I've never had any issues with purging air out of a Nissan until this one! I parked on a steep incline, overfilled the reservoir a little, ran the engine 2000-3000 RPM for over half an hour while monitoring the coolant temp with a scan too to make sure it was operating at a normal range. I'm going to replace the heater lines before they break and I'm going to look into using the electric heater pump setup for an R51 Pathfinder w/ rear heat and see if that works (I have a couple of them laying around).