

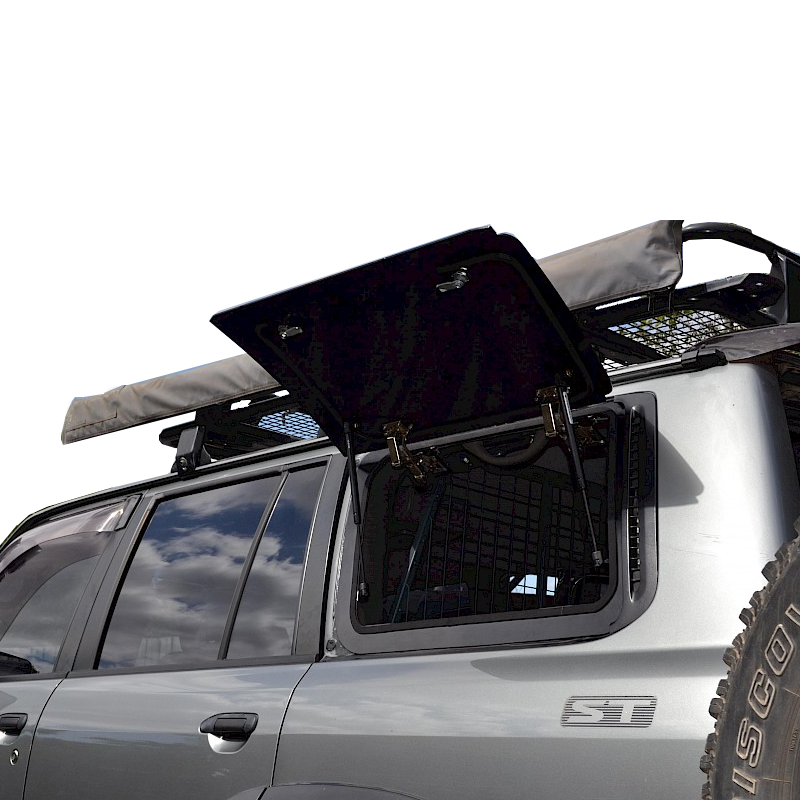
Version 2.0
The big update for version 2.0 was aluminum instead of plexiglass.
![Image]()
![Image]()
![Image]()
![Image]()
There will be a version 3, eventually... version 3 will include a gas strut and better latches.
Version 1.0
![Image]()
![Image]()
![Image]()
![Image]()
\/ \/ OUTDATED INFORMATION BELOW \/ \/
This is more of a "How I'm Gonna Do It" thread. I'm gonna go through the parts list and a mock procedure. Then all you smart, mechanically inclined cookies can critique it and I'll begin the process for real.
![Image]()
There is a separate thread on this project here . If you want to talk about the utility or feasibility of a gullwing window please take it over there and keep this thread technical.
I found a how-to over on NissanPatrol.com.au here but unfortunately I don't speak Australian so that's all the credit they're getting.
Goals:
Phase I - DONE
-Research
-Measure (amount of moulding, panel size, estimate weight/forces required)
-Acquire parts
Phase III - DONEZO
-Installation
Anticipated install date: 04/01/2017
The big update for version 2.0 was aluminum instead of plexiglass.


There will be a version 3, eventually... version 3 will include a gas strut and better latches.
Version 1.0


\/ \/ OUTDATED INFORMATION BELOW \/ \/
This is more of a "How I'm Gonna Do It" thread. I'm gonna go through the parts list and a mock procedure. Then all you smart, mechanically inclined cookies can critique it and I'll begin the process for real.
There is a separate thread on this project here . If you want to talk about the utility or feasibility of a gullwing window please take it over there and keep this thread technical.
I found a how-to over on NissanPatrol.com.au here but unfortunately I don't speak Australian so that's all the credit they're getting.
Goals:
-Rear cargo area access from the side (primary objective)
-Decreased visibility into cargo area (this is going on the driver's side so I don't need to see out)
-Locking
-Theft resistant (since nothing is theft proof)
-Does not whistle in wind
-Does not leak when it rains, snows, freeze thaw, etc
-$100 out the door-Decreased visibility into cargo area (this is going on the driver's side so I don't need to see out)
-Locking
-Theft resistant (since nothing is theft proof)
-Does not whistle in wind
-Does not leak when it rains, snows, freeze thaw, etc
Phase I - DONE
-Research
-Measure (amount of moulding, panel size, estimate weight/forces required)
-19"tall x 26.25" wide
-87" circumference (~7.5')
-use 1/8" plexiglass
-Look at upper support for hinges (is the mounting surface strong enough)?-87" circumference (~7.5')
-use 1/8" plexiglass
-upper mounting surface is very sturdy. Self tapping sheet metal screws will be a big winner here
-Drill right through headliner and into metal frame. Easy as pie.
-Is the window flat (would make things so much easier)?-Drill right through headliner and into metal frame. Easy as pie.
-No, it has a small bend. We're gonna have to do some forming of acrylic sheet using my mom's oven
-Is a frame necessary?-No. 2 brackets will need to be installed on the bottom edge for compression latches
Phase II - DONE-Acquire parts
-(1) Acrylic sheet (36" x 24")
-(2) Rubber trim/weatherstrip 8 ft sections
-(2) Compression latch, 1 locking, 1 regular
-Hardware
-(1) Silicon adhesive/liquid nails
-(2) Rubber trim/weatherstrip 8 ft sections
-(1) bulb style for vehicle side to promote weather resistance)
-(1) C style for the edge of plexiglass
-(2) Hinges-(1) C style for the edge of plexiglass
-(2) Compression latch, 1 locking, 1 regular
-Hardware
-(10) self tapping sheet metal screws
-(10) pan head spanner screws (for secure connection of hinge to window)
-(1) 24" x 36" vinyl wrap-(10) pan head spanner screws (for secure connection of hinge to window)
-(1) Silicon adhesive/liquid nails
Phase III - DONEZO
-Installation
[ ] -Remove window
[ ] -Remove glass from face and hands from broken window
[ ] -Place hinges
[ ] -Drill hinge holes in plexiglass
[ ] -Cut holes for compression latches
[ ] -Dry fit
[ ] -Apply carbon fiber wrap
[ ] -Apply molding
[ ] -Dry fit
[ ] -Glue
[ ] -Assemble
[ ] -Crack a cold one
[ ] -Remove glass from face and hands from broken window
[ ] -Place hinges
[ ] -Drill hinge holes in plexiglass
[ ] -Cut holes for compression latches
[ ] -Dry fit
[ ] -Apply carbon fiber wrap
[ ] -Apply molding
[ ] -Dry fit
[ ] -Glue
[ ] -Assemble
[ ] -Crack a cold one
Anticipated install date: 04/01/2017


