Second Generation Nissan Xterra Forums banner

VintageX's Xterra

22K views 89 replies 25 participants last post by  Peacemkr45  
#1 · (Edited)
Intro Comments: I finally joined the club!
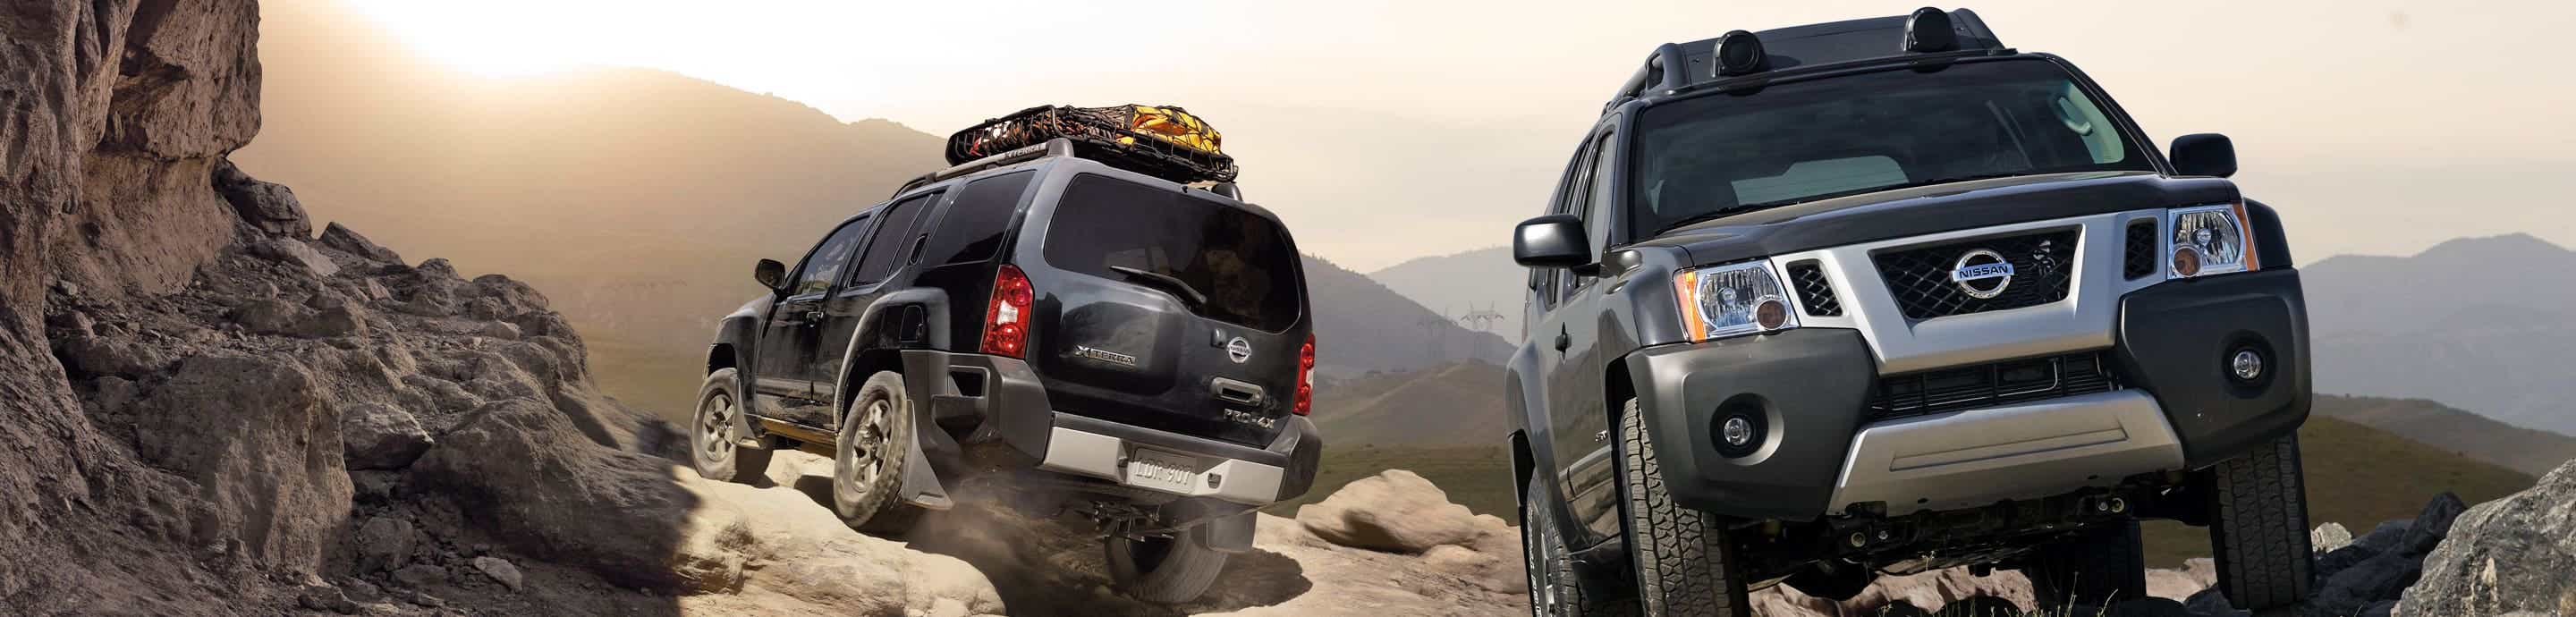
Mine is a 2014 Metallic Blue PRO-4X with a 6MT. I had been looking to replace my 2007 Frontier for about a year and finally found the right truck. You can read about the endlessly long purchase saga here.

Intro Photos:
Image

Image

Image


Make: Nissan
Year:
2014
Model: Xterra
Trim: PRO-4X
Color:
Metallic Blue B17

MODS:
  • ✓ Remove hood deflector
  • ✓ Manual Gearbox sticker (post #1)
  • ✓ Pin stripe removal (post #2)
  • ✓ Blind spot mirrors (post #7)
  • ✓ Retrograde to 2008 rear "shorty" head rests (post #8)
  • ✓ New floor mats (post #13)
  • ✓ Vintage style shift knob (post #14)
  • ✓ Mud flap removal (post #16)
  • ✓ First Aid Kit upgrade (post #17)
  • ✓ Left front tow hook (post #19)
  • ✓ Engine cover and cargo carpet and shade (post #20)
  • ✓ Tire Repair kit (post #24)
  • ✓ Roof Rack Cross Bar repair (post #25)
  • ✓ Scepter Fuel Cans
  • ✓ New Red Tow Hooks (post #31, #32)
  • ✓ Tyger Roof Basket and Danchel 6.5 x 8.2 ft awning (post #33)
  • ✓ SumoSprings! (post #34)
  • ✓ MotoTote Carrier with SumoSprings (post #36)
  • ✓ New Group 24F Everstart Platinum AGM Battery (post #41)
  • ✓ Scratch Repair... Safety Stripes (post #42)
  • ✓ NightGuide Platinum Headlight bulbs. (post #43)
  • ✓ Pilot Motorsports Stainless Exhaust Tip (post #46)
  • ✓ Gobi Ladder Install and hatch struts (post #47 & #48)
  • ✓ Auxito Interior and Backup Bulbs (post #50)
  • ✓ Rear Differential Breather (post #51 & post #71)
  • ✓ Atoto Stereo head unit install (post #52)
  • ✓ Power Outlet and Volt Meter install (post #53)
  • ✓ Ham Radio Install (post #54 and #87)
  • ✓ ARB M226 Differential Cover Prep (post #64)
  • ✓ ARB M226 Differential Cover installed, and heater plastic junctions replaced (post #72)
  • ✓ Headlight polishing (post #73)
  • ✓ Ham Radio Direct Power (post #87)
  • ✓ 14" Rear Wiper Blade (post #88)
  • more to come....
PHOTOS:

As originally purchased: Brought it home yesterday and today I removed the old pinstripes and hood deflector. I may also remove the window deflectors... I'm not sure:
Image


Image


I also put on a sticker on the rear window showing off the 6 speed...
Image


The truck is completely stock and has only 41,000 miles. A brand new clutch, flywheel, release bearing and dual mass flywheel were just installed. The brake rotors were also resurfaced. To me it seems like it drives like new.

The truck came with some fancy PRO-4X stickers on it... I think these are designed for the Frontier and must have been added by the dealer or original owner. I think they look pretty good but may be too flashy for me. I'll test drive them for a while.

The manual makes it much more fun to drive than my auto Frontier. It's great being able to choose your own gears!
 
#2 ·
I removed the pinstripes with a scraper with plastic blades, a heat gun, and some acetone for cleanup.
First I carefully cleaned the area around the pinstripe. You don't want to scratch the paint by scrubbing dirt into it.
It was a cool day, so I used a heat gun just a bit to soften the pinstripe adhesive. If you use the gun too much the pinstripe will stretch and break.

After pulling up the pinstripe there is some residue left behind. I softened it with acetone and used the plastic scraper to scrape it off, wiping off the area regularly. Frankly, this was the hard part, it took a bunch of scrubbing to get all the residue off. Of course, it's harder because I was being very careful not to scratch the paint.
Note: I tried an "eraser wheel" and it did not seem to help on the residue.

The results were excellent, and you cannot tell the pinstripes were ever there.

(PS: the acetone worked for me, but be careful using this on your paint! Your mileage may vary and while it was fine for me, it might hurt your paint.)
 
#3 ·
Great truck!
Just Gorgeous!
My first X was this color.
With the NightArmor my favorite.
A manual transmission is great and to have to partially rebuilt by the dealer even better.
 
  • Like
Reactions: VintageX
#6 ·
I ordered a pile of simple accessories: the plastic engine cover that was deleted from the Xterra in 2008 or so, new mats. trunk mat, cargo cover, other easy stuff.
Also I ordered a custom shift knob. ;-)
The low cut 2008 headrests should come in a couple days.

Sadly, one of the engine pulleys just started to squeal. Sounds to me like it is coming from the power steering oil pump pulley, but I hear the tensioner pulley is often the source. I made an appointment at carmax for a warranty repair, should be easy enough.

My code reader has also shows a P1614 code, an IMMU-KEY error. The truck starts fine... I cleared the code and will see if it comes back. If it does, I'll try the other key for a couple days to see if it is one of the keys or something else.
 
  • Like
Reactions: bluez
#9 ·
I ordered a pile of simple accessories: the plastic engine cover that was deleted from the Xterra in 2008 or so
I'll be curious to know how long you end up keeping the cover on! I picked one up at the junkyard a couple years ago cause mine didn't have one. It's now sitting in my garage somewhere :p
Even with the grommets lubed it was always a pain to remove, sometimes nearly impossible without a big prybar for leverage. And I've seen folks crack their valve covers trying to remove them because of that. So after struggling to get it off the last time I just left it off.
 
#7 · (Edited)
Blind Spot Mirrors

A zillion years ago (circa 1978) my dad taught me "The Right Way" to set the car mirrors:
Image

Please, no arguments about this, I only posted it to show what I do and how I use the blindspot mirrors.

But the truck mirrors are big enough (in my opinion) to accommodate a small blind spot mirror. I use these on Frontier and just bought a set for the Xterra. They are adjustable so you can easily get them just right. I set the side mirrors all the way out and they then only slightly overlap. with the center cabin mirror. And then I set the small rond blindspot mirror to show the side of the truck and the ground next to it.
Image
 
#8 · (Edited)
Headrest Retrograde
I wanted a better view out the back and so I found some 2008 headrests on eBay.

Original:
Image


Retrograde (2008)
Image


Improved Rear View
Image


Note these older headrests come in a variety of colors and patterns. The ones I purchased are solid gray. The color is a great match with the rest of the seat but the fabric is a bit different. IMO The fabric difference is only noticeable if you actually look for it.
I think they look and work great!
 
#13 ·
While the old floor mats are still in pretty good shape, there are new ones available on eBay for a fairly reasonable price. I couldn't resist making the truck feel "new" to me!
Here is the new mat over the old mat for comparison:
Image

Not a big difference, but worth the new feeling to me.
The full set of mats is available here for 80 bucks:
 
#14 ·
Vintage "billiards ball" style shift knob installed.
Image

Picked the colors to match the rest of the interior. But I was really tempted by the blue one.
 
#16 ·
Pulled the mud flaps from one side. Here is the comparison.
before:
Image


after:
Image


For my mild off-roading, this probably isn't necessary. I might prefer some small flexible mudflaps over none.
I wonder if these would fit nicely...
Image

 
#17 ·
First Aid Kit Upgrade!
Image


I checked out the poor skinny first aid kit It was a shame how meager it is compared to the big bump in the rear hatch!
I went through it in detail and confirmed everything in there was good an intact.
And then I added the following items:

  • Adventure Pocket Survival Kit
  • Lighter & Fire Starter
  • 6-foot cord
  • Waterproof Matches
  • Advil
  • Tylenol
  • Pepto tablets
  • Benedryl tablets
  • Bonine tablets
  • Sting Kill Swab Vials
  • Medical Shears - Scissors
  • Swiss army knife
  • Splinter Out Lancets
  • Tweezers
  • Comb
  • Earplugs
  • Quick Clot Gauze Pad
  • Wound Seal Powder
  • Vet Bond “superglue”
  • Aluminum splint 4-¼” x 36”
  • Nitrile Gloves
  • Alcohol Wipes
  • Bacitracin Ointment
  • Aquafor Ointment
  • Ace Bandage
  • “Israeli” Sterile Compression Bandage
  • J&J Bandaid Waterproof Adhesive tape
  • 3M Nexcare Cloth Tape
  • Bandaids
  • Saline Wash Packs
  • Spare Contact Lenses

I was happy that I was able to fit all of this into the bag in addition to the original kit.
Personally, I think this is a pretty solid kit now!
 
#26 ·
First Aid Kit Upgrade!
View attachment 143148

I checked out the poor skinny first aid kit It was a shame how meager it is compared to the big bump in the rear hatch!
I went through it in detail and confirmed everything in there was good an intact.
And then I added the following items:

  • Adventure Pocket Survival Kit
  • Lighter & Fire Starter
  • 6-foot cord
  • Waterproof Matches
  • Advil
  • Tylenol
  • Pepto tablets
  • Benedryl tablets
  • Bonine tablets
  • Sting Kill Swab Vials
  • Medical Shears - Scissors
  • Swiss army knife
  • Splinter Out Lancets
  • Tweezers
  • Comb
  • Earplugs
  • Quick Clot Gauze Pad
  • Wound Seal Powder
  • Vet Bond “superglue”
  • Aluminum splint 4-¼” x 36”
  • Nitrile Gloves
  • Alcohol Wipes
  • Bacitracin Ointment
  • Aquafor Ointment
  • Ace Bandage
  • “Israeli” Sterile Compression Bandage
  • J&J Bandaid Waterproof Adhesive tape
  • 3M Nexcare Cloth Tape
  • Bandaids
  • Saline Wash Packs
  • Spare Contact Lenses

I was happy that I was able to fit all of this into the bag in addition to the original kit.
Personally, I think this is a pretty solid kit now!
Great bug out bag if needed.
 
#22 ·
I finally joined the club!
Mine is a 2014 Metallic Blue Pro-4X with a 6 Speed Manual.
I had been looking to replace my 2007 Frontier for about a year and finally found the right truck. You can read about the endlessly long purchase saga here.

Make: Nissan
Year:
2014
Model: Xterra
Trim: PRO-4X
Color: Metallic Blue B17

Mods:
  • ✓ Remove hood deflector
  • ✓ Manual Gearbox sticker (post #1)
  • ✓ Pin stripe removal (post #2)
  • ✓ Blind spot mirrors (post #7)
  • ✓ Retrograde to 2008 rear "shorty" head rests (post #8)
  • ✓ New floor mats (post #13)
  • ✓ Vintage style shift knob (post #14)
  • ✓ Mud flap removal (post #16)
  • ✓ First Aid Kit upgrade (post #17)
  • ✓ Left front tow hook (post #19)
  • ✓ Engine cover and cargo carpet and shade (post #20)
  • more to come....
View attachment 142837

View attachment 142838

Brought it home yesterday and today I removed the old pinstripes and hood deflector. I may also remove the window deflectors... I'm not sure.

I also put on a sticker on the rear window showing off the 6 speed... View attachment 142839

The truck is completely stock and has only 41,000 miles. A brand new clutch, flywheel, release bearing and dual mass flywheel were just installed. The brake rotors were also resurfaced. To me it seems like it drives like new.

The truck came with some fancy Pro-4X stickers on it... I think these are designed for the Frontier and must have been added by the dealer or original owner. I think they look pretty good but may be too flashy for me. I'll test drive them for a while.

The manual makes it much more fun to drive than my auto Frontier. It's great being able to choose your own gears!

Awesome, congrats bro! Almost identical to mine, other than the decals. (I swear I'll get some pics up soon) Thanks for the tips on the mirrors and headrests! Glad you held out for a 6MT too, you won't regret it.
 
#23 · (Edited)
I'm surprised how much I enjoy driving it! Just ordered a roof rack and some fuel cans to put up there. Any adventures in yours?
 
#24 ·
Tire Repair Kit
I picked up a WYNNsky Tire Repair Kit. Looked about the same as the ARB one to me. I have used various ones of these in the past and they can be very handy when you need them.
When I received it, I was shocked at the size of the box it came in. But one of the amazon reviews mentioned using a tactical pouch to repack it, and I found this one that was cheap and worked great. Being a soft pouch also means it will be easier to pack away in the corner of the truck.
Image

Image
 
#25 · (Edited)
Roof Rack Cross Bars
I had a BUNCH of trouble removing the cross bars from the roof rack.
Image

Apparently the previous owner or shop had over tightened them and stripped the buts in the plastic. Getting them off was documented in this other thread: Roof Rack Crossbar Nuts Spinning.

And then I found the clamps were cracked from over tightening. ARG!
Image


I have had great experience repairing this kind of problem with J-B Weld Epoxy.
I cleaned the parts with simple green and a high pressure spray and then dried them thoroughly with compressed air and the hot sun for a while.
Then I carefully gooped them up with the epoxy, doing my best to get the epoxy into the cracks and adding some to provide a "patch" on the outside of the crack. I used a clamp to squeeze the crack shut and then let it dry for about 36 hours.
Image

Image


You can see how the clamp squeezed the epoxy through the crack to the inside.
Image


We will see how this holds up! I'll also ask carmax if they will replace these under warranty.

NOTE: THE EPOXY FAILED! I took the crossbars off to check them and one end had cracked again. But... CarMax came through with free new replacements. I just bolted the new replacements on and threw out the old crossbars.
 
#30 ·
Scepter Fuel Cans for the roof rack!
I'm still working on installing the roof rack. But these came today! Whoot!
Image
 
#31 · (Edited)
Fun with recovery hooks.
I scored a nice left side tow hook from the Thorton Breakers in the UK. I figured after all that I'd better show them off and paint them a bright color.
Image

Image

Image


I'll let these dry for a couple days before installing.
 

Attachments

#32 ·
Installed the hooks yesterday. Torque specs seems to be really high.
The manual says grade 9T, M12-1.25 Hex Flange bolt without lubricant: 130Nm or 96 ft-lb.
That's a lot of torque for me, so I did them to 70 ft-lb.
Image


I think the bit of red peeking out is fun. -