

Just another unistrut crossbar project, with a way to mount Rotopax and many other items to them. Inspiration / blatant copying from the following threads:
https://www.thenewx.org/forum/23-exterior/141697-roof-rack-clamps.html
DIY Rotopax factory roof rack mount - Toyota FJ Cruiser Forum
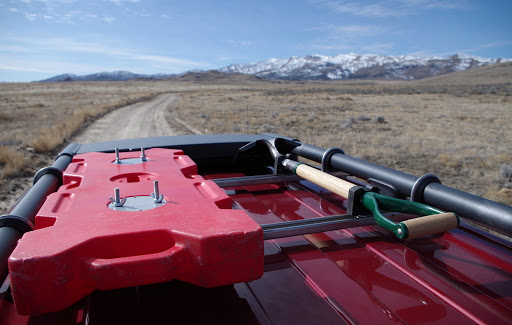
I wanted a way to mount some Rotopax fuel cans (and other things, including traction boards, a shovel, etc) to my roof in a low profile fashion, without a lot of expense. This method keeps the items as low as possible and between the roof rails.
The unistrut is low profile (13/16") stainless, cut into sections to span the width of the roof rack. A 10' section happens to divide equally into three pieces about the right size, though I'm only using two at this time.
The ends of the strut channel can be a little sharp, so you can use end caps to prevent scrapes and cuts. I got these from Mcmaster Carr
https://www.mcmaster.com/cadinlnord/3312t11
I used the vibration damping clamps from McMaster Carr
McMaster-Carr Damping U-Bolt Clamps
and drilled through the strut channel to mount it directly to the clamps.
I did need to add just a little thickness to the rack so that the clamps were tight. Some have used a thin piece of silicone but I just cut some strips of rubber from a bike inner tube and that worked fine too.
![Image]()

So now we have crossbars with infinitely adjustable mounting locations. You can use the 3/8" spring nuts:
Superstrut 3/8 in. Channel Spring Nut (5-Pack)-ZA1003/8EG-10 - The Home Depot
and then you can mount pretty much anything to the strut with a 3/8" bolt.
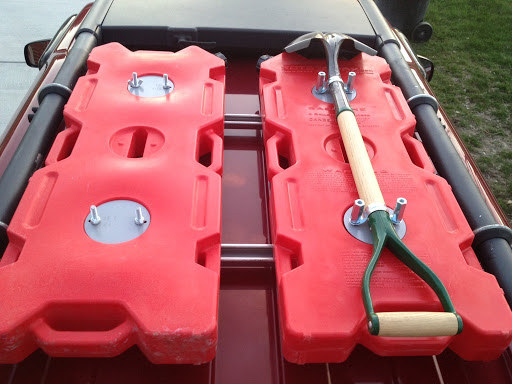
In this case I wanted to mount some Rotopax cans. The fuel cans are great, but expensive... luckily I was able to purchase a couple factory blemished ones at <1/2 price.
![Image]()
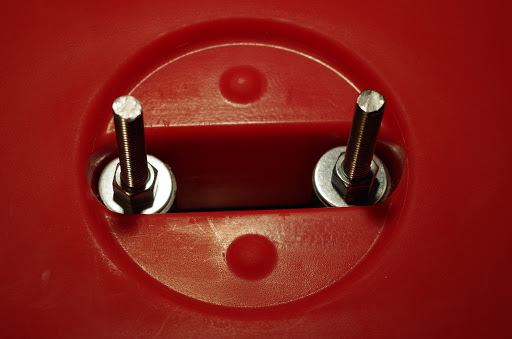
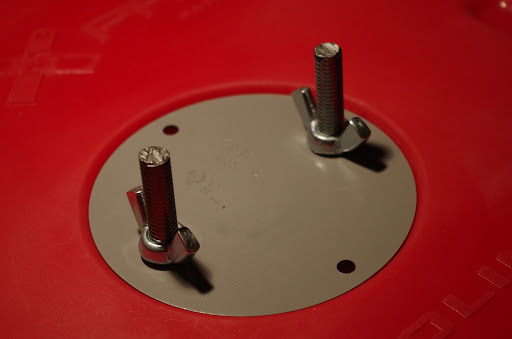
Using some 3/8" rod, 3/4" PVC, washers and nuts, and 4" round electrical box plates, I made some mounts similar to those pictured in the FJ thread above. The cost was around $30. The main difference is that I am using the strut channel rather than drilling through factory crossbars. This allows much more flexibility in mounting. Also, since I have the 4GL Rotopax I created two sets of mounts rather than the one central one shown in the thread.
![Image]()
![Image]()
![Image]()
Depending on use, the strut crossbars can be mounted above or below the side rails of the stock rack.
![Image]()
https://www.thenewx.org/forum/23-exterior/141697-roof-rack-clamps.html
DIY Rotopax factory roof rack mount - Toyota FJ Cruiser Forum
I wanted a way to mount some Rotopax fuel cans (and other things, including traction boards, a shovel, etc) to my roof in a low profile fashion, without a lot of expense. This method keeps the items as low as possible and between the roof rails.
The unistrut is low profile (13/16") stainless, cut into sections to span the width of the roof rack. A 10' section happens to divide equally into three pieces about the right size, though I'm only using two at this time.
The ends of the strut channel can be a little sharp, so you can use end caps to prevent scrapes and cuts. I got these from Mcmaster Carr
https://www.mcmaster.com/cadinlnord/3312t11
I used the vibration damping clamps from McMaster Carr
McMaster-Carr Damping U-Bolt Clamps
and drilled through the strut channel to mount it directly to the clamps.
I did need to add just a little thickness to the rack so that the clamps were tight. Some have used a thin piece of silicone but I just cut some strips of rubber from a bike inner tube and that worked fine too.

So now we have crossbars with infinitely adjustable mounting locations. You can use the 3/8" spring nuts:
Superstrut 3/8 in. Channel Spring Nut (5-Pack)-ZA1003/8EG-10 - The Home Depot
and then you can mount pretty much anything to the strut with a 3/8" bolt.
In this case I wanted to mount some Rotopax cans. The fuel cans are great, but expensive... luckily I was able to purchase a couple factory blemished ones at <1/2 price.

Using some 3/8" rod, 3/4" PVC, washers and nuts, and 4" round electrical box plates, I made some mounts similar to those pictured in the FJ thread above. The cost was around $30. The main difference is that I am using the strut channel rather than drilling through factory crossbars. This allows much more flexibility in mounting. Also, since I have the 4GL Rotopax I created two sets of mounts rather than the one central one shown in the thread.
Depending on use, the strut crossbars can be mounted above or below the side rails of the stock rack.


")


