Second Generation Nissan Xterra Forums banner

Unistrut / Superstrut Crossbars and Rotopax / Treds / Shovel Roof Mount

4 reading
100K views 125 replies 32 participants last post by  El_Guevara  
#1 · (Edited)
Just another unistrut crossbar project, with a way to mount Rotopax and many other items to them. Inspiration / blatant copying from the following threads:

https://www.thenewx.org/forum/23-exterior/141697-roof-rack-clamps.html

DIY Rotopax factory roof rack mount - Toyota FJ Cruiser Forum

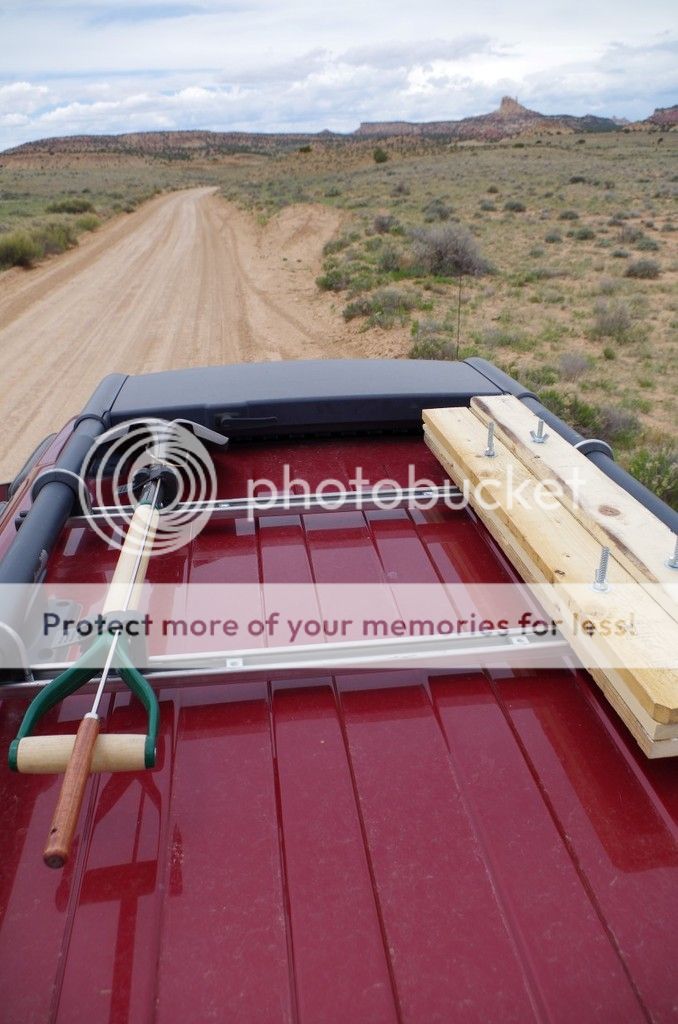
I wanted a way to mount some Rotopax fuel cans (and other things, including traction boards, a shovel, etc) to my roof in a low profile fashion, without a lot of expense. This method keeps the items as low as possible and between the roof rails.

The unistrut is low profile (13/16") stainless, cut into sections to span the width of the roof rack. A 10' section happens to divide equally into three pieces about the right size, though I'm only using two at this time.

The ends of the strut channel can be a little sharp, so you can use end caps to prevent scrapes and cuts. I got these from Mcmaster Carr
https://www.mcmaster.com/cadinlnord/3312t11

I used the vibration damping clamps from McMaster Carr
McMaster-Carr Damping U-Bolt Clamps

and drilled through the strut channel to mount it directly to the clamps.

I did need to add just a little thickness to the rack so that the clamps were tight. Some have used a thin piece of silicone but I just cut some strips of rubber from a bike inner tube and that worked fine too.

Image


So now we have crossbars with infinitely adjustable mounting locations. You can use the 3/8" spring nuts:
Superstrut 3/8 in. Channel Spring Nut (5-Pack)-ZA1003/8EG-10 - The Home Depot

and then you can mount pretty much anything to the strut with a 3/8" bolt.

In this case I wanted to mount some Rotopax cans. The fuel cans are great, but expensive... luckily I was able to purchase a couple factory blemished ones at <1/2 price.

Image


Using some 3/8" rod, 3/4" PVC, washers and nuts, and 4" round electrical box plates, I made some mounts similar to those pictured in the FJ thread above. The cost was around $30. The main difference is that I am using the strut channel rather than drilling through factory crossbars. This allows much more flexibility in mounting. Also, since I have the 4GL Rotopax I created two sets of mounts rather than the one central one shown in the thread.


Image


Image


Image


Depending on use, the strut crossbars can be mounted above or below the side rails of the stock rack.

Image
 
#7 · (Edited)


We got out on a day trip to play on some dirt roads this past weekend and tried out the roof mounted Rotopax and shovel. We didn't really need the extra fuel but wanted to test everything out and make sure it was solid.

The setup worked well. I picked up some Quickfists for the shovel and bolted them to some 1/4" channel nuts. I didn't notice any wind noise from the shovel, and it sits level with the roof rails so I don't think it's causing much extra drag.

The Rotopax stayed securely in place, but I did experience an occasional rattle where the tail side of the fuel can would vibrate slightly on washboard road. The mounting points on the Rotopax were very solid, but I think there's just enough flex in the fuel can where the tail end is cantilevered and bounces slightly... maybe it's worse when the walls of the can swell from the fuel expanding.

Overall I'm really pleased with the setup but would like to eliminate the rattling.

EDIT: Turns out is was the front bolt of the rear roof rail mount that was loose, working on fixing that.
 
#8 ·
I'd bet a straight bar perpendicular to the strut with some foam on it would take up that extra "slack" that lets it vibrate. Maybe just wrap the bar (either flat or round) in fuel or radiator hose to act as a cushion.
Or at worst, an extra cross bar with a foam/rubber block on it... might be useful for mounting other stuff closer to the rear hatch later (dirty snatch strap, hatchet, traction boards).
 
#9 ·
Great suggestions, thanks! I actually have a third crossbar that I cut (a 10 foot strut piece conveniently divides in 1/3rds that are just the right size for this) and I have two more clamps as well, so it would be easy to add. The third bar in the back would definitely help and will probably be necessary later when I get my Treds, which are almost a foot longer than the Rotopax.
 
#10 ·
Man you are a genius. Thats a great way to go and not have to pay the stupid prices for rotopax mounts. Great setup my friend. Are you going on the Pony Express run today? I just finished putting my rotopax on top of the X for the spare fuel. Again. Great job and hopefully Ill see you out there today.
 
#13 ·
Hey, sorry I just saw this post now. Ironically I originally bought the Rotopax fuel can for last years Pony Express run. But then we had friends come into town to go skiing, so we didn't go. This year we went down to Moab for the weekend, so unfortunately couldn't be in both places and didn't make it to Pony Express. Looks like it was an awesome trip though, I've seen some photos that people have posted.

I'm hoping that the Utah Xterra crew gets out on some more group trips because I'm way overdue to meet some other forum members in person!
 
#17 ·
Thanks Fredy. I got the strut at a local surplus freight place that sells a lot of random industrial stuff and metals, and I lucked out because it was really inexpensive.

You can find strut channel at industrial, electrical or plumbing suppliers, Grainger, McMaster Carr, etc. It's used in a lot of applications.

McMaster-Carr

Even Lowe's has it, although their selection is more limited and I've only ever seen the slotted material there.


Nice setup! Super low profile too!

Might be over thought but since the gas tank and all the steering column is on the left side of the truck, I would put that extra 4 gallons on the right side to even up the weight distribution.
Thank you, the low profile was something I was aiming for.

Good idea on the weight distribution, I hadn't really thought of it since the fuel isn't very heavy (under 35 pounds), but there probably is more weight on the drivers side. The good thing is that it would take just a few moments to swap sides, just slide the channel nuts over to the passenger side.
 
#18 ·
After installing a third crossbar, I realized it was one of the bolts on the rear roof rail stanchion that was causing my rattle. Noticed it about five minutes before we took off on a day trip. As a temporary fix I shoved some rubber from an old bike inner tube around the roof rail to keep the rattling down.

I wish it had been my design that caused the rattling, that would be easier to fix than the loose bolt on the roof rack mount that just spins and will not tighten nor loosen :frown:
 
#19 · (Edited)
Well I haven't taken the time to tear into the roof and tighten that bolt up, but the rubber is still keeping it pretty stable, with no rattles. So it's good enough for now.

Here's the setup with two 4GL Rotopax plus shovel, getting ready for a big weekend trip and needed to extend the fuel range a bit more.

Image


Sorry for the lame driveway cell phone pic, will get some better ones in a few days!

The shovel brackets are just a 1" pipe bracket, and I used coupling nuts rather than wing nuts since the bracket interferes with the wings. May still have some room for improvement on this but it didn't rattle, didn't loosen up, and is quick and easy to put on and take off.
 
#20 ·
Well I haven't taken the time to tear into the roof and tighten that bolt up, but the rubber is still keeping it pretty stable, with no rattles. So it's good enough for now.

Here's the setup with two 4GL Rotopax plus shovel, getting ready for a big weekend trip and needed to extend the fuel range a bit more.


Sorry for the lame driveway cell phone pic, will get some better ones in a few days!

The shovel brackets are just a 1" pipe bracket, and I used coupling nuts rather than wing nuts since the bracket interferes with the wings. May still have some room for improvement on this but it didn't rattle, didn't loosen up, and is quick and easy to put on and take off.
Clever idea on mounting the shovel with it! Looks good!
 
#21 ·
Totally forgot to take any pictures of the two Rotopax / shovel setup on the trail. But I grabbed this from another guys photos.


And this one shows the profile (kinda)


It worked great, only needed one of the gas cans but it was nice to have the extra. Stayed nice and solid over 200+ miles of dirt.
 
#23 · (Edited)
My DIY solution is working great for me and I like the lower cost, lower weight and lower profile of it, so not much interest in those, although the second one isn't as bad.

The cargo baskets sitting on top of our factory roof rack always make me think of a guy wearing two hats*, just doesn't look right to me.

Image


*Pictured guy might actually be wearing three hats, hard to tell.
 
#26 ·
Pre-drilling/cutting lumber to easily transport it to a camp fire? I guess that IS the safest way lol.

Spread those out a bit, and use them as a "floor" to stack a couple logs parallel to the strut, then run a tie-strap around the strut to lock it all down.

BTW, I can't wait for my TRED Pro sand ramps to come in so I can attempt this mod myself.
 
#27 ·
Haha yeah! It is a little odd, but... it's free from my work, it's already cut in the right size pieces and it's clean, dry wood. I just have to drill a couple holes, so it takes seconds with a drill press and wood bit.

I could also use it as a platform to carry odd sized items. Or under the wheels to get unstuck, or probably lots of other uses.

I know what you mean about the Treds, they're running out of time to get them out in May as promised. Looks like production was actually going to begin late last week though, so hopefully they'll be shipping soon.
 
#28 ·
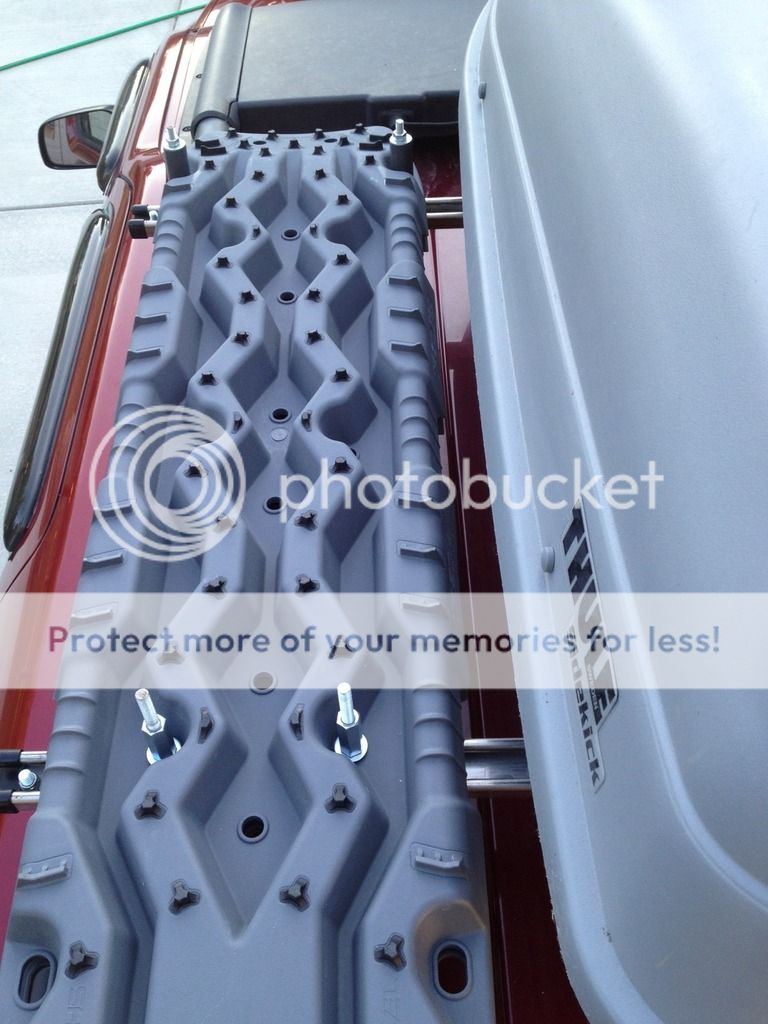
Two months after I posted that, my Tred Pro's finally arrived. I had been hoping that with all the potential mounting holes, somehow they would line up the same as the Rotopax. Unfortunately they're just a bit off, bummer. I may go with the third crossbar when I'm carrying Treds plus fuel.

We are heading up to Wyoming this weekend for a camping trip. I don't think we'll need extra fuel but did want extra storage up top, so I inverted the strut mounts to give a little more width for the pair of Treds and our little Thule cargo box. Still need to figure out a solution for mounting my shovel on top of the Treds.

 
#29 ·
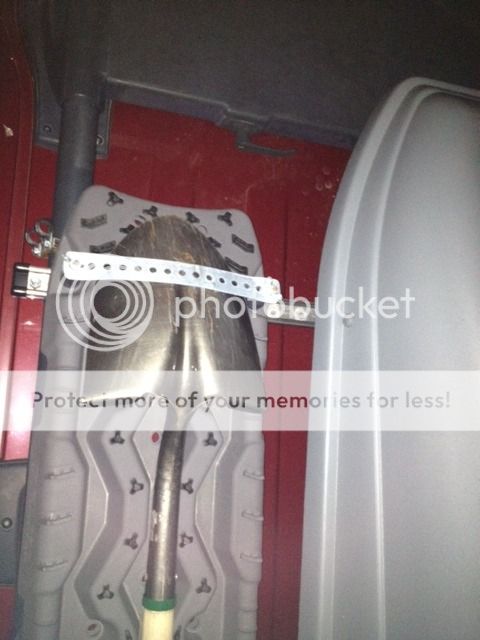
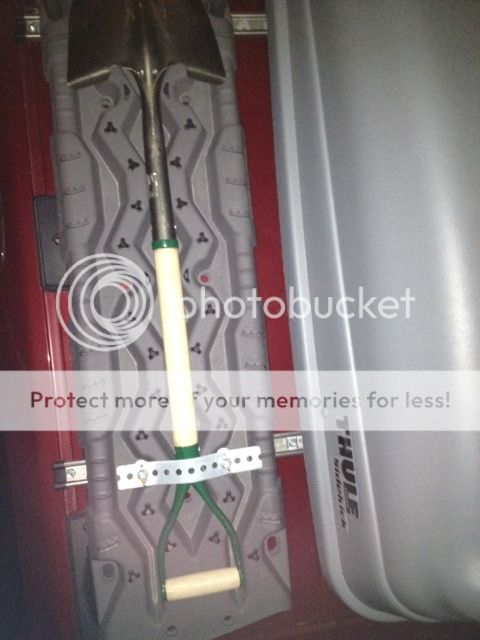
Figured I should update this, the shovel mount was incredibly simple. Just added some thick steel strap with holes and wing nuts to secure it to the Tred Pro mount.


Sorry for the low quality pics but it should be pretty easy to see how it works. Didn't budge on a 2000 mile road trip.
 
#30 ·
Maybe some rubbler/foam so it doesn't wiggle loose and develop a rattle? I'm thinking metal stretching, bending, treds compressing a bit, etc... something that would leave to wiggle, which would lead to wear.
It DOES look simple and effective though!

I know the treds are supposed to be "used as a shovel".... but I can't see that working well AT ALL for anything except the softest of sand.... so thats a nice convenient way to get the shovel and treds all at the same time.
 
#31 ·
I thought it may loosen up too, but on this trip it did not. I have some inner tube rubber that I carry in the tool kit for things like that, but didn't need it at all. Conveniently, this particular shovel nestles nicely in the pattern of the Treds, like it was made to fit there.

Yes the Treds would suck to use as a shovel. Better than your hands I guess. I also carry a packable snow shovel that would be better in loose sand and, well, snow... it fits in the rooftop cargo bin.
 
#32 · (Edited)
I moved the strut crossbars back under the side rails, adding the third bar back into the mix to allow me to more easily mount up both Rotopax and Treds (and a shovel).

Using them on this past weekend's winter camping trip, I discovered one problem with the strut bar and spring nuts: ice

Image


Wet snow from the day before had melted and then frozen in the track and rendered the spring nuts immobile. I was in a hurry since I was getting ready to leave for my trip, so I grabbed some isopropyl alcohol and mixed some 100 proof ice melter. Poured it on the nuts and in the track, and after a few minutes I could move them where I needed to.
 
#35 · (Edited)
A lot of times I don't need to bring extra fuel, or just need the 2GL in the wet box for a little fuel insurance, but the crossbars continue to be really handy for carrying the Tred's and a shovel. Finally got around to taking a couple better photos of that setup.

I used the quickfists for an easy place to stash my roof mounted NMO mount CB antenna when going through some low hanging branches. Took just a moment to unscrew the antenna, clamp the base in the quickfist, then drive through the branches without ripping anything off. Worked great.

Image


I have thought about getting some star knobs rather than the simple little wing nuts, but it seems like that would draw more attention to what's up there, so for now they're doing the job. I have not had any significant loosening up with this setup on many weekend trips to the desert, and week long road trips over several states.

Image
 
#37 · (Edited)
A few people have asked about any changes or improvements made to this setup. Really the only thing I would add is that when you have the strut mounted below the rack, it works best to have some kind of spacer between the legs of the ubolt to keep the pipe clamp from slipping into the strut channel.

I used a little chunk of ipe (it's a very dense, strong rot resistant wood) and cut it down so it just fits in the channel. It has held up really well but you could use HDPE, aluminum, or many other materials as long as they fill that space.

Image


Image


Again, this is only when the strut crossbars are mounted below the rails and clamps. When the clamps are inverted there is no need for a spacer, though I have used a shorter set of ubolts and shaved them down slightly so the threads of the ubolt don't protrude over the top of the low profile channel.

Image