Second Generation Nissan Xterra Forums banner

Brunnie's Tonka Build

16K views 36 replies 8 participants last post by  Brunnie  
#1 · (Edited by Moderator)
Intro Comments: Tonka is a daily driver so it has remained a mostly stock Xterra. I do take it off road mainly doing roads that are rated 4 and below, which Colorado has tons of for fun exploring. We’ve been over Tincup Pass, Tomichi Pass, Cumberland Pass (and to the top of the hill there), up many of the roads in the Buena Vista, Fairplay, Alma, Como area. We also have done some trails in Moab such as Tower Arch, Willow Springs, Shafer Switchbacks & Potash Road, Long Canyon (Pucker Pass).

Brunnie’s Xterra: Geocaching/Exploring Build

Username: Brunnie
Since 2014

Xterra Nickname: Tonka

Make: Nissan
Year: 2011
Model: ❌terra
Trim: S
Color: Avalanche White

Factory Options:

Mud Flaps (removed)

MODS

Suspension/Steering:

Front:
Pro 4 suspension
Moog Sway Bar Links
Front Spacer

Rear:
Pro 4 Shocks
Re-arched Springs with an extra leaf added
Nisstec Adjustable Shackles

Tires:
265/70R16 Firestone Destination AT

Interior Mods:
LED interior lighting
Upgraded the LED lighting in the Map Light
LED “junk tray” lighting
2 Additional power outlets
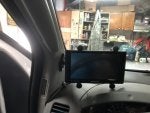
DeLorme InReach SE mount
Auto Dimming Mirror w/Temperature & Compass
Pathfnder Overhead Temperature and Compass display
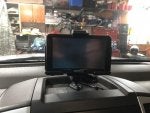
Garmin Nuvi GPS mount
Hep Design Rear window Molle panel
Raingler Ceiling Cargo Net

Exterior Mods:
Aftermarket Fog Lights
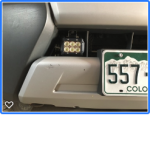
Aftermarket LED floodlights
Rear Differential Breather mod (Nissan P/N 38323-C6010 or 3823-C601A barbed nipple for a C200 axle)
16" Rear Window Wiper (Ace Hardware spring #162)
Tow hook on Driver's side
Nisstec Recovery points
Gas Hood Strut Kit
Pro-4 Skid plates
Quick Fist Rubber Clamps
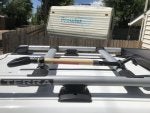
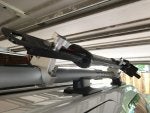
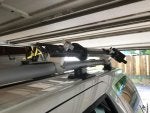
Hi-Lift Jack Mounts
Southco Locking Handle for the wetbox
Nisstec Shock Skids

Misc Stuff:
Funtreks Colorado Backroads &4 WD Trails Books
Funtreks Moab Backroads & 4 WD Trails Book
Numerous Trails Illustrated Maps
All the NFS maps for Colorado
Boulder Tire Deflators
Viair 400P Portable Compressor
GearAmerica Recovery Tow Strap
motormic Shackle Receiver
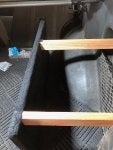
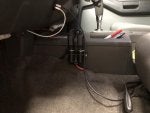
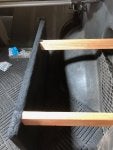
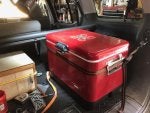
Modified Cooler Retainer by adding a small shelf (see below)
Hi-Lift 48" jack


PHOTOS
 

Attachments

#2 · (Edited)
Added a Garmin Drive 60LMT gps for off-road navigation.

I put this GPS in the lower Left corner of the windshield, using the suction mount. I may change it over to a RAM arm mount once I'm sure I like it here.
The third photo shows how I got power up to the GPS. Both plugs are for GPSRs, one is for normal driving. I tapped power out of the fuse block, radio fuse, and ground was from behind the radio.
 

Attachments

#4 · (Edited)
Fog lights are:
Xterra Fog Lights

If you have or get the light stalk with the fog light switch in it, then you can use the stock harness. The lights have the brackets and all hardware needed. If you don't have the stalk, I didn't, I used the supplied harness and switch. They go in the regular fog light opening.

The flood lights do a good job of lighting a wide area. I aimed the left one a bit to the right so as to not blind oncoming traffic. Out on the backroads at night they really add extra light to your whole field of vision. The nice part is they don't draw much current. Where I have them mounted in the grill opening prevents a lot of bouncing.
I picked them up at the local Pull-n-Pay. SCORE!!!
 
#8 ·
Bump - Again -

Added Gas Hood Strut kit entry. (Did this a long time ago and just thought of it now.)

Amazing what you think of that you've done when someone else just did it.
 
#11 ·
Also installed a Raingler Ceiling cargo net. This came about after a trip to Yellowstone, and our jackets/hoodies being in the way all the time, or being at the bottom of the pile of "stuff" and hard to dig out.

Ready for some more over-landing trips. Where to next?
 

Attachments

#12 ·
Although not earth shattering, I came across a deal for factory skid plates (better than none, IMHO) that I couldn't pass up so I installed them yesterday. I spent about an hour under Tonka getting the job done.

Last weekend was the install of a CB radio and antenna. Getting ready for next spring's adventures.
 
#14 ·
More prep for next year's adventures.

Picked up a deal on a Hep rear window molle panel, so I installed that. My home brew wire shelving panel is no more.
 
#15 · (Edited)
Prepping for Road Trips, and this fall's trip, I got to thinking about how to keep the cooler from sliding around. Last year I didn't have any problems, even going back to Crystal Mill by Marble, CO, however I still wanted something to keep things in place so I came up with this idea.

First I put in a tie point from a Pathfinder.

Then I measured how far out from the track it was to the small storage space on the right side, 13" in this case, and I cut two "legs" and attached them to a 24X12 inch board. The board fits into the track so that keeps it from moving. I covered the board with black material, used for headliners, that I got from a fabric store. I glued it in place, and touched up a bit with staples.
 

Attachments

#16 ·
So here it is in actual final configuration. I used a strap to go from the tie point around the cooler and to the seat latch.

Yeah, the legs either need paint or covered in the same material.
 

Attachments

#18 · (Edited)
Today was "install a mod I was testing on the bench" day. The LED lights I put in the Map Light just weren't bright enough for me so.... it is off to the bench and grab a spare map light fixture and start experimenting.

A while back I purchased this LED reel from Amazon for another project.
SUPERNIGHT LED Light Strip Cool White 7000K The project left me with a surplus of light strip so I got the bright idea for modding the map light.

The nice part about this led strip is that you can cut to length, at the marks, with 3 LEDs being the minimum. That length just fits inside the Map Light. A bit of cutting and modding the fixture itself, adding a piece of matte board cut to fit, some 30 ga wire for strip to strip connections, and finally 26 ga wire for power and ground to the posts in the fixture and it looks like this.
 

Attachments

#21 ·
Added a pair of Quick Fist Clamps .
The front one is a Mini size and the rear one is an Original size. Shovel holder for upcoming trips.
 

Attachments

#22 ·
In prep for some off-roading, I bought a Recovery Shackle, and Recovery Strap. I also added a pic of the air compressor.
 

Attachments

#23 · (Edited)
Made a modification to this:


Added a little shelf to the end that goes near the wheel well. The propane tank sits in the section between the legs and we put a gallon water jug on the shelf.

(Got a little sloppy with the spray glue. *ugh*)
 

Attachments

#24 ·
So I've been a bit busy working out some kinks with my 2 Nuvis. Both wanted to vibrate downwards, making seeing the screen totally difficult, while out wheeling. SO... for the solution I headed to RAM Mounts, and then Amazon.

3 of these:
Ball Mount
2 of these:
Double Socket Arm
1 of these for the Nuvi 2555LMT:
HOL-GA52U 2555LMT Cradle
1 of these for the Nuvi Drive 60:
RAM X-Grip Large

And that problem was solved.
 

Attachments

#26 · (Edited)
So I also came across a deal on Craigslist for a Hi-Lift jack. So that meant I had to get mounts for it and here is how that turned out. The mounts are at an angle for 2 reasons. 1 - Easier to load and unload the jack while standing on the ground. 2 - They clear the garage door.
 

Attachments

#27 · (Edited)
Added a set of Nisstec adjustable shackles in the rear, and a small spacer up front to raise Tonka a bit. Set the rear shackles for 1.5 inches to keep a decent rake.
 
#29 ·
Well......... ;) :ROFLMAO:
Probably. :eek:

I'm pretty sure that if I put the star nuts on the mounts that they will hit the door frame. I'm also pretty sure that the base plate of the jack will hit the door frame also, but I've not tried either yet to see. One solution would be to turn the mounts a bit towards the side of the Xterra and see how that works out. Another solution (and probably far easier) is to just put the jack on AFTER I pull out of the garage (and remember NOT to drive in with it mounted. :eek: )

Several things to check out when the weather is warmer and nicer. For right now all is well.
 
#30 ·
Added an ARB 1250x2500 awning to the side of Tonka. Now lack of shade on the trail while breaking for a meal is a thing of the past. ;)

Photos to come when we set it up outside on a nicer day.